|
Adventures of a Transplanted Gardener |
||||||||||||||||
Three more rain barrels: Construction overview
| ||||||||||||||||


 |
Dean built a four-foot high deck for the new barrels so the force of gravity would increase the water pressure and I wouldn't have to stoop over to water the nearby vegetables. The deck had to be sturdy enough to hold more than 1400 pounds of water in the barrels plus a human or two.
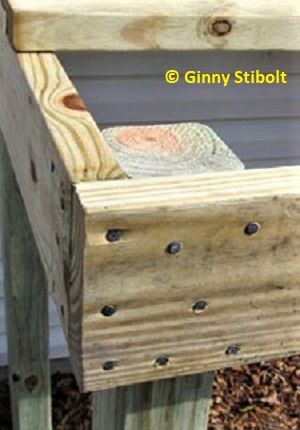
Most of the dimensions were determined by the standard length of lumber. Three and six-foot lengths of 2x6s were cut from 12-foot pressure-treated lumber. The three-foot long 2x6s were overlapped by the six-foot boards so the width of the deck is slightly wider than three feet. The four-foot high 4x4 legs were cut from two eight-footers.
Dean pre-drilled all the holes for the 3.5" galvanized nails for the deck. This made driving the nails easier and more accurate. Pre-drilling also minimizes splitting the wood.
 |
|
|
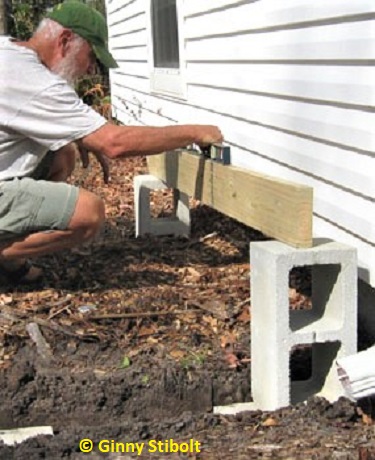
Once the bones of the deck were assembled, the next step was to calculate the depth of the footings so the barrel tops would be far enough below the gutter opening to allow for drainage of the rainwater. If we'd placed the deck footings at ground level, the barrels would have been too high to effectively collect water.
After calculating the depth, Dean dug out the holes for the footers (flat, solid cement blocks) and tamped down the soil. Next he tested for leveling in all directions. He used the two cinder blocks to test the level between the ends because the footings are below ground level. The leveling is crucial since the deck will be supporting so much weight. Any small difference could torque the structure enough to cause leaks in the plumbing.
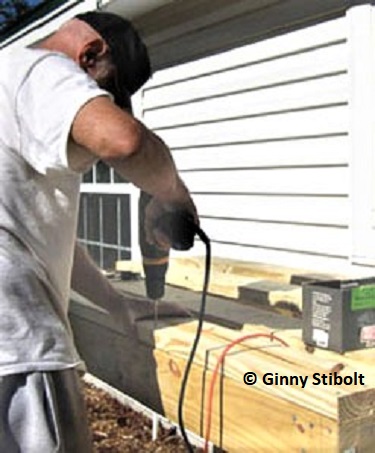 |
When the blocks were leveled, we put the deck frame in place--it just sits loosely on top of the footings. We hoisted an empty barrel atop the loose planking to re-test the height and the level. After everything measured up, it was time to affix the deck.
The deck boards were spaced so that the barrels would center on two boards toward the back of the deck, with a large enough gap for the PVC fittings that come out the bottoms of the barrels. Anyone standing on the deck would have two boards for footing toward the front. After the decking was in place, we tested the level again before we started work on the barrels.
Note: We covered the area around the footings with a thick (6 inches or so) layer of chopped wood mulch. We've noticed over the years that wherever we put down thick layers of mulch, the ants are less likely to nest there, but we'll check for ants around the footings on a regular basis.
 |
The barrels
The barrels have lipped rims that tend to collect water. Drilling four ½ holes in that lip allows water to drain and avoids creating mosquito-breeding areas. Because the plastic is slippery and hard, drilling these holes is a three-step process: 1) Using a hammer and awl to make a dent in the plastic. 2) drill a small hole with a ¼" bit. 3) Finally drill with the ½" bit for your drain hole. These holes are usually large enough that they don't clog with debris, but you may need to clear them during the spring when trees drop their reproductive parts all over the place.
 |
The barrels will be linked together by their bottom through-fittings so all the barrels fill as a group. When the water reaches the top, each barrel needs an overflow, which Dean constructed using the built-in ¾" top fittings. After the overflow pipes were in place, he placed the barrels on the deck so the overflow pipes all pointed in the same direction and lined up in a straight line so he could connect the three overflow pipes together to take the overflow water away from the barrels, but he didn't connect them yet.
Now that the barrels were in their final positions, Dean measured and marked where the bottom holes for the through-fittings would be placed. They had to be located in a straight line along the gap between the deck boards.
 |
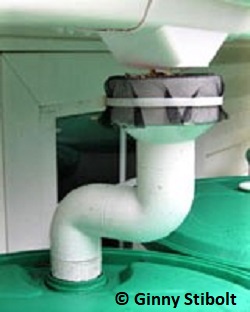
The most critical procedure was creating the threaded holes in the barrels for the bottom through-fittings. He drilled a one-inch hole at each mark. Then he needed to create female threads in each hole to receive the male threads of the 1" PVC through-fitting. For this task he bought a four-inch long, one-inch diameter steel plumbing nipple, which was threaded on both ends. He carefully twisted the steel nipple into each drilled hole to create the threads in the plastic. (This was instead of buying an expensive pipe tap set.) He then wrapped Teflon tape around the male threads of each through-fitting before he screwed the fittings into the newly threaded holes.
Dean then put the barrels in their final positions and connected the through-fittings with 1" pipes and fittings and sealed them with PVC cement because these pipes will be under pressure. The pipes all connect to a spigot (hose bibb) constructed with PVC parts, which is supported by running it through a hole in a plank nailed to the end-board of the deck. After the 1" pipes were connected he then connected the ¾" overflow pipes to remove excess water from the area.
We also bought a Y-fixture for the spigot so we could leave the hose attached and also be able to easily fill a bucket or watering can. The hose runs along the garage wall and it positioned so that it can reach most of the vegetable gardens without too much dragging. It's all part of making the irrigation easier.
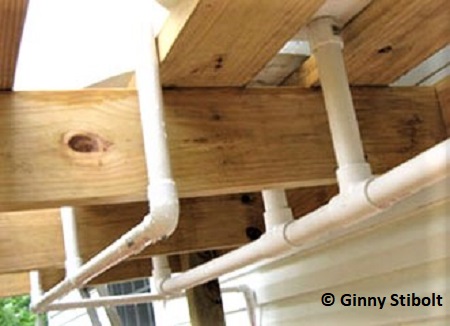 |
<< The under-deck view from barrel #1 toward barrel #3.
The view toward barrel #1 and the PVC spigot. >> |
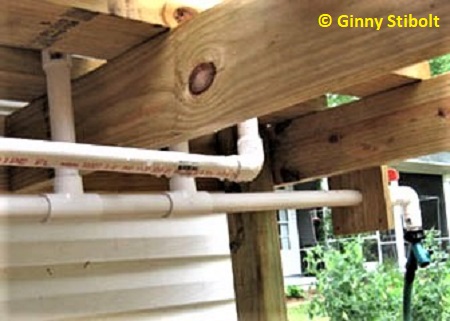 |
In the above photos: The series of 1" pipes toward the garage wall include the through-fittings in the bottom of each barrel and lead to the spigot. The ¾" pipes toward the front of the deck are the bottoms of the overflow pipes. In the left photo, you can see that the overflow pipes run along the end of the deck and then down along the wall. At ground level the pipe runs parallel to the garage wall away from the area to prevent excess water from undermining the footings.
 |
 |
 |
Collecting the rainwater
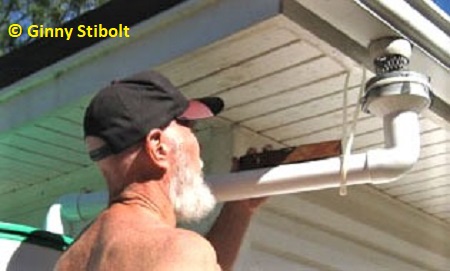
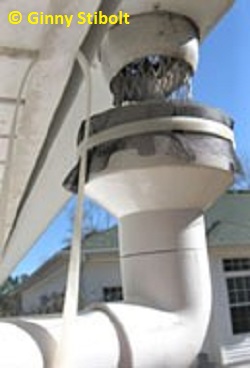
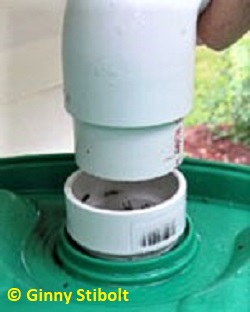
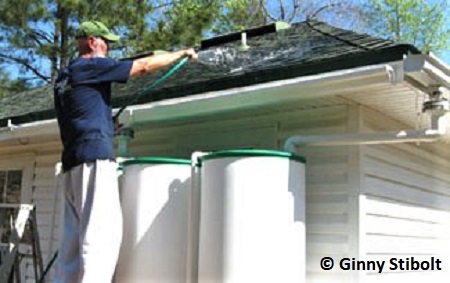
After the barrels were all in place and connected with their plumbing fixtures, it was time to construct the collection pipes. We affixed a square of fiberglass screen with a zip-tie to the four-inch end of a two-to-four-inch adapter and trimmed away the excess. This is a 2-person job. This screen-covered adapter was positioned under the opening where the downspout was located and attached to a series of two-inch pipes (supported by a plastic sling attached to the fascia board) leading to a standard, threaded 2" opening in barrel #1. Dean used a level to make sure that there was a slight downward angle from the collection point to the barrel. These pipes are not under pressure and no cement was used here. This allows for easy disassembly for cleaning.
 |
 |
We originally thought that we'd just collect the water from the existing metal gutter on the side of the garage. But having uncollected water drip right onto the barrels seemed wasteful, so we installed a separate 10' plastic gutter over the barrels being careful not to disturb the moisture sensor for the irrigation system that is mounted in the middle of the back garage eave. The gutter is cut to make room for the downspout, which flows into another four-inch, screen-covered collection device that empties into barrel #3.
After the separate gutter was in place, Dean tested the water flow from the roof with water pumped from the other barrels through the hose to make sure the rainwater wouldn't leak between the gutter and the edge of the roof. We tested the overflow function when we transferred all the water from the original three barrels. Most of the time the water will overflow in between the blueberry bushes, but in preparation for a tropical storm, we'll hook up a hose so the excess water can be released into a low wooded area.
During a short rain shower (resulting in only 0.2 of an inch) he went out in the rain with his umbrella to watch the real rain flow into the gutters and into the barrels. Using the rainfall-to-gallon formula, the 0.2 inches of rain resulted in approximately 9 gallons collected by the new gutter and 24 gallons from the existing gutter. My veggies are loving it and so is my back!
For more resources and information, go to my rain barrel articles: Three More Rain Barrels, Climb Up My Rain Barrels, and Rain Barrels Revisited.
(Update: Eventually the wood gave out and we switched to cinder blocks, at first, in the same place, but since the tiers of blocks were not tied together and settling occurred, we moved them around the corner to the same wall as our other rain barrel series, which was down to two, because the oldest one had split. Read about these further adventures here and here.)
Ginny Stibolt is a life-long gardener, a botanist, a naturalist, and a garden writer. You may contact her or read more of her articles posted on her website: www.greengardeningmatters.com.
Copyright Ginny Stibolt