|
Adventures of a Transplanted Gardener |
|||
Composting for your garden
|
|||

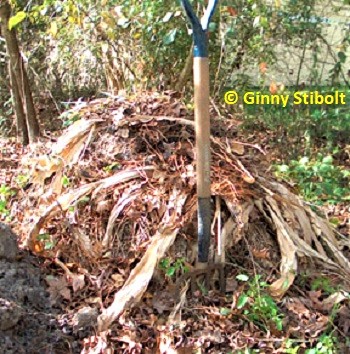
 Compost should not look like materials that went into the pile. After 18 months this compost is done. Compost smells like the forest floor--Actinomycetes at work. |
In June 2004 when we moved to Florida, I found an out-of-the-way spot on our lot for a compost pile. Since then I've used the most informal method for compostingwhen I had leaves, weeds, or clipping, I piled them on top. I didn't turn the pile or pay attention to whether the materials were "brown" or "green". ("Brown" materials are carbon-rich items such as dried leaves, straw, and wood chips. "Green" materials are nitrogen-rich and moist; they include grass clippings, weeds, coffee grounds, and kitchen scraps.) I knew composting was happening because the pile stayed the same size for more than 18 months of heavy gardeningapproximately 3'x3'x3'.
When we decided that the vegetable garden needed a complete soil replacement, it was time to harvest the compost. I set aside the top layer of recently deposited and un-composted waste and dug into the heart of the compost. The beautiful, crumbly compost smells like the forest floor because of the Actinomycetesa bacterium that acts like fungus and plays a big part in the rotting process that turns plant materials into compost. (More information on this is in my fungus article.)
|
|
The compost doesn't look like any of the stuff that I threw onto the pile. One exception was the Mexican Petunias (Ruellia brittoniana), which had sprouted from little pieces. Their purple sprouts were thick in some parts of the pile. Maybe this is why it's a noxious and invasive weedit can survive the composting process and live underground for more than eight months. It was tedious to separate it from the good compost, so next time it will be dead and crispy before it hits the pile. The other unwelcome invader was Catbriar (Smilax spp.)its tough roots had grown up into the pile.
General composting guidelines
I've done some sleuthing for better ways of composting and found some great websites with specific directions, the science, and some projects for kids. (See below.)
Here are the general composting guidelines:
-
Do add gardening waste, but not diseased plants or noxious weeds.
-
General rule of thumb is to use equal amounts of green and brown materials.
-
Do add kitchen scraps, but not meat, oils, or dairy.
-
You may add manure from horses or cows, but don't use pet or human feces.
-
Don't add twigs larger around than your fingerthey take too long to deteriorate.
-
Keep compost moist, but not wet.
-
The composting materials need to have enough mass for the microbes' activity to raise the temperature. Rule-of-thumb is that a pile needs to be at least 3'x3'x3', but not greater than 5' in any direction to allow air into the pile.
-
The more often you turn the pile the faster it will become fully composted. (Turn = rearranging pile so the stuff that was on top is on the bottom and the stuff on the outside is on the inside.)
-
You can use a bin or not. A bin will be neater and easier to turn. (I wouldn't have had Catbriar roots if I'd used a bin with a bottom.) Bins made of wood will last a few years.
-
Make sure the compost pile is at least two feet from any building.
-
Mulching a garden area is called sheet composting: it is very slow because there is not enough mass to raise the temperature.
My new plan for composting
I could spend all my time adjusting the compost pile, if I followed all the advice. I could turn it every day, take its temperature to gauge its activity, buy special composting worms, test the acidity, add fertilizer or lime to adjust for misbalances, and more.
I've designed my own simplified plan, because I'd rather spend my time actually gardening:
1) I'll have two separate compost piles: one pile for new deposits and one for quicker withdrawal.
-
Withdrawal pile: In order to generate compost sooner and because I have a lot of material right now, I've created a pile that I'll turn once in a while. I constructed this new, 3'x3'x5' pile in alternating layers: a) leaves and pine needles, b) weeds, green clippings, and Water Hyacinth (Eichhornia crassipes), and c) thin layers of soilto add microbes. I pulled the Water Hyacinth from the lake next to our lot. It has good nutrients that will produce better compost. The purpose for the layering is to manage the 50 to 50 ratio of brown to green materials. Once the turning process begins the layers will be obliterated.
-
Deposit pile: The other pile will be a more passiveI'll add garden waste as I generate it. This is what I did before and it works fine, but it's slow. Maybe I'll turn it once in a while to speed up the process or if it's not finished by the time I use up the withdrawal pile, I'll incorporate this passive pile into a new withdrawal pile.
2) I'll try to keep both piles moist during dry weather.
That's it. It should work well, but I'll keep you posted.
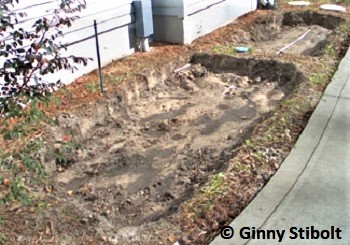
These two areas will be our vegetable garden. I've already added layers of leaves, compost, composted horse manure, and topsoil. |
Using compost in the vegetable garden
My husband and I dug the sandy soil from the garden bed behind the house to about one shovel deepto the sprinkler pipes. Some of the manure and mulch we added last year under the plants was evident, but most of it was so sandy, it wasn't working well for our tomatoes (Lycopersicon lycopersicum) or peppers (Capsicum annuum). (Note: I would not recomend this double digging now, but composting in place on top of the soil produces better results with better drainage by leaving the underlying soil alone.)
I dumped a bunch of dry leaves directly from the yard into each section of the bed. After I stomped them down, it was about a two-inch layer. I then piled the compost (worms and all) on top of the leaves. This added another three inches. Next we added horse manure. We repeated these three layers (without the stomping) until the soil level was about ten inches above grade. I will cover it with a thick layer of pineneedles and leaves to keep it moist and to keep the worms in place. In six weeks when our seedlings will be ready to plant, we'll fill the beds with a mixture of equal parts: composted manure, topsoil, and that sandy soil that we dug out.
The leaves in the bottom will hold the moisture and will decompose into rich soil, too. We're hoping that this dramatic treatment will produce more satisfactory vegetables. The herb garden will get a much lighter treatment, but we'll be enriching that part of the bed as well. Next year we hope to have some cool weather cropsmaybe some mustard greens (Brassica juncea), Swiss chard (Beta vulgaris), and spinach (Spinacea oleracea).
Every gardener needs to compost
Every gardener needs to compost for better soil: whether you have sandy soil, like we do, or clay soil, compost is the answer. Plus it's the right thing to doour taxes are paying for bigger and bigger landfills to accommodate more and more waste. Composting is not only good for gardens, it allows all of us to live more gently. Let me know about your composting projects.
Resources:
- EPA's information on composting includes the backyard gardener: www.epa.gov/recycle/composting-home
- An easy-to-understand guide for composting. It also includes suggested science projects.
Ginny Stibolt is a life-long gardener, a botanist, a naturalist, and a garden writer. You may contact her or read more of her articles posted on her website: www.greengardeningmatters.com.
Copyright Ginny Stibolt